Tuesday, February 25, 2014

A Dapper Dinosaur

I'm thinking about calling this collection of yarn animals the "Loopy Zoo Collection." Here is the latest installment, a super cute dinosaur with a dapper bow tie and top hat!


The basis for this pattern came from a free pattern available on Ravelry.com by Nicki Sandoval.  You can find it here. However, I made quite a few adaptations, including redesigning the head so that his nose (snout? What does one call that part of a dinosaur's face?) was a little larger. In the original pattern, the nose was not very differentiated from his face. 


I also redesigned his feet so that they had more of a foot shape, instead of being simply round. I did the little chap's left foot first, just sort of making it up as I went along. When I tried to recreate it for the right foot, it came out quite a bit larger, as you can see, and I'm not sure why. I'll work on it a bit more and give you guys the pattern later, once I have the bugs worked out. 

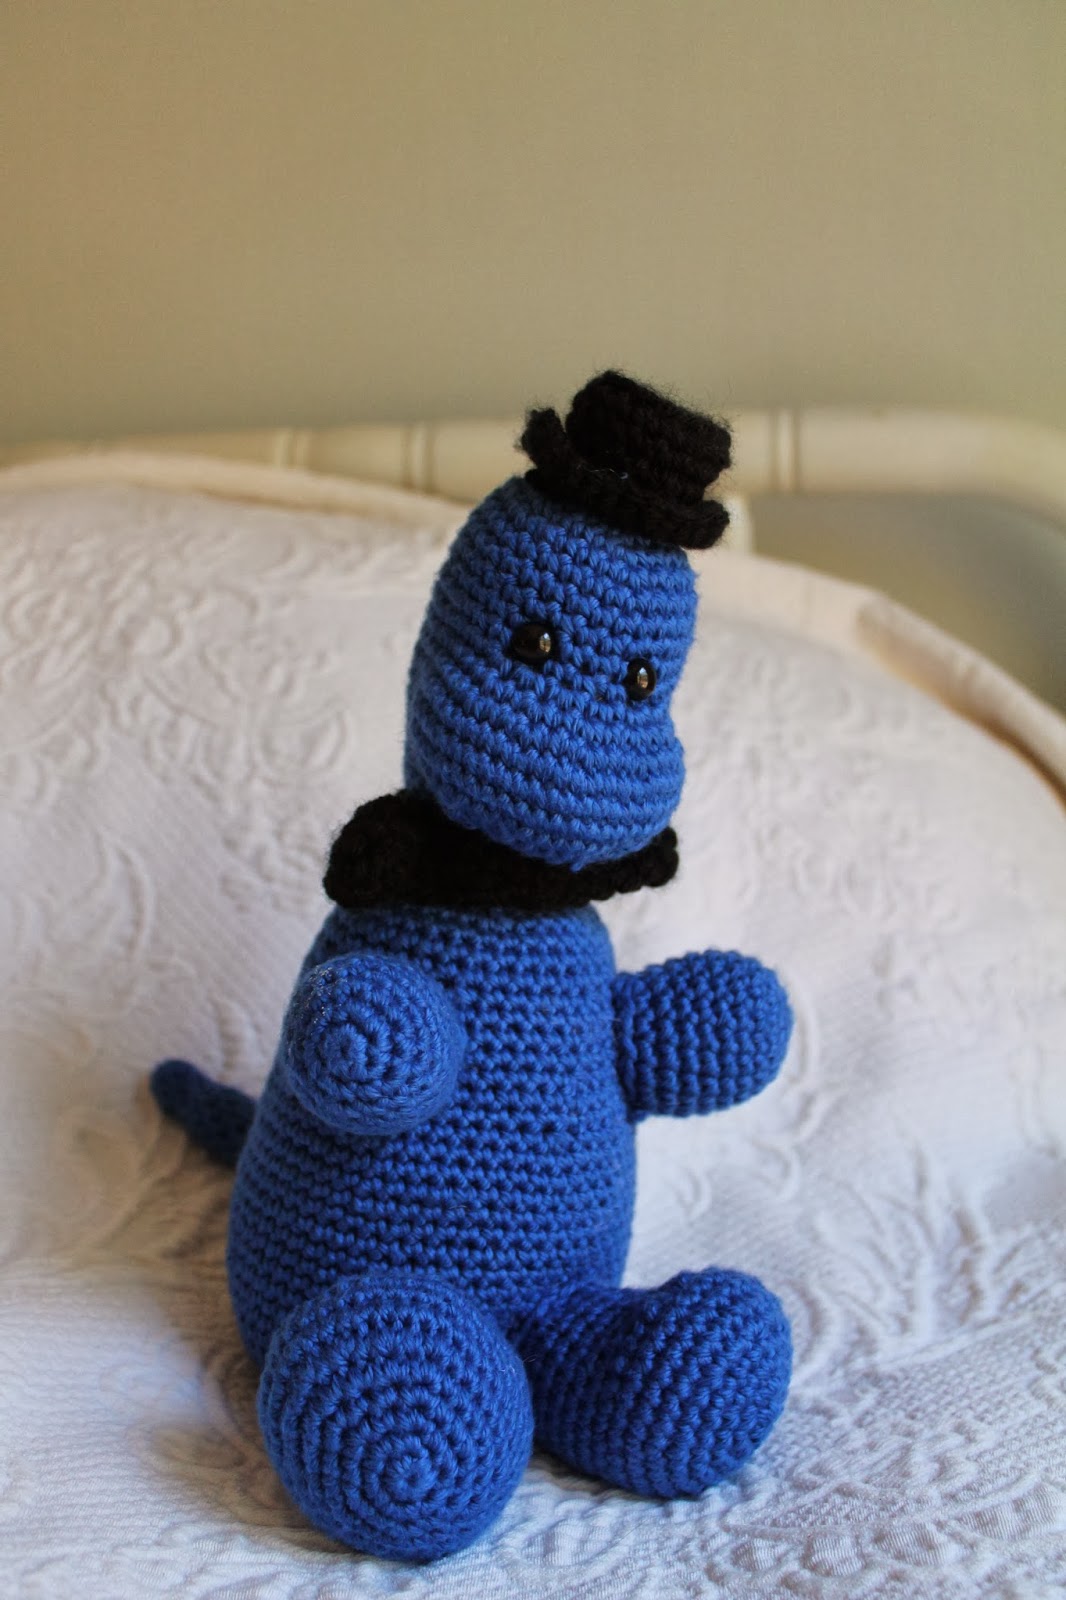
I decided to give him a bow tie because when I sewed the head and neck together, there was a rather obvious seam, and I wanted something cute to cover it up. Because this dinosaur is a boy, and is a gift for a little boy, I decided on a bow tie. 


And then I thought he was looking a little bald, and I figured a top hat would go quite well with the bow tie. And he was starting to look so dapper, I loved it!


Then my mom suggested giving him spikes down his back. For the spikes, I tried my hand at steam blocking for the first time, and I don't know if I didn't let it sit long enough and get completely dry or what, but I was not that impressed because the spikes never did get quite as pointy as I wanted them to. 

I'll post my patterns for the dinosaur's bow tie and top hat, and if you want more details about the way I adapted the dinosaur pattern from Nicki's original pattern, let me know. 

I realize this is not even remotely accurate to any sort of real dinosaur...for one thing, I don't think dinosaurs even sat on their bottoms like this, much less wore bow ties and top hats, but we're just gonna roll with it...and I think he turned out very handsome. Hope you enjoyed!

Love, 
Emily


Monday, February 24, 2014

The Unicorn Reunion Tour!

Like I said in my first post, my crochet unicorns are my most popular items. I have made over a dozen custom orders for my students and others (using this pattern from Eden Dintsikos, found at Ravelry.com). This post will show a small sampling of the various possible color combinations, although there are endless possibilities!


Madelyn's unicorn shows the most popular color combination: white and hot pink. 


The unicorn on the left is Isabella's, and the one on the right is Brooke's. 
I love how they added their own accessories to personalize their unicorns and showcase their personalities! This photo shows how you can easily adapt the size of the unicorn by using different thicknesses of yarn and different sizes of crochet hooks. 

Brooke's unicorn was one of the first I made, in light and dark purples. I love how Brooke added her own accessories--a pink fuzzy headband/crown, and a cute little pink dress!


Isabella's unicorn (which she named Clara) is made with hot pink and peach yarn, and she added a tutu and legwarmers that came with her American Girl doll, which happen to be the perfect size!


Here's a better picture of the legwarmers, and the cute little braided tails!

Friday, February 21, 2014

Beehive Stitch Scarf--A Free Pattern!

Here is the pattern for the beehive stitch scarf I wrote about yesterday in this post.

I used bulky weight yarn (I'm sorry, I can't give you specifics because the yarn was a gift from a friend from her stash, and the label had been removed). It's definitely fun if you have a self-striping or multi-colored yarn, because as you crochet a beautiful pattern is revealed!

I used size I (5.5mm) crochet hook.

Stitches used:
Ch = chain
Dc = double crochet
FPdc = front post double crochet

Here is the pattern:

Chain a multiple of 2 plus 1. (I did 21, but you can chain more or less based on how wide you want the scarf to be.)

Row 1: starting in 4th chain from the hook, work 1 dc in each ch across, turn.

Row 2: ch 3 (counts as first dc), skip first st, *1 FPdc in the next dc, 1dc in the next dc, rep from * across, ending one dc in top of turning ch, turn.

Row 3: ch3, skip first st, *1 FPdc in the next FPdc, 1 dc in the next dc, rep from *, ending with 1 fc in top of turning ch.

Rep row 3 for pattern.

Make the scarf as long as desired. Mine is only about 2 feet 6 inches long.

Sew a large button in the center of the fourth row of the scarf. Your weave should be loose enough to be able to work the button through wherever you want it. Enjoy your scarf!


I adapted this pattern from this book: The Complete Photo Guide to Crochet


Wednesday, February 19, 2014

Beautiful Beehive Stitch Scarf

I crocheted this scarf as a thank you/Christmas gift for my dear friend Karen whose favorite color is purple. I thought the beehive stitch really brought out the gorgeous texture and beautiful color gradient in this yarn (I'm sorry, I can't tell you exactly what this yarn is, because another friend gave it to me out of her stash, and the label had been removed).


The only drawback was that I ran out of yarn, so it made a very short scarf! The scarf, as it was, worked well if you tucked it under your coat, but you couldn't wrap it around your neck at all, or wear it without a coat. Fortunately, my crochet friend Shelia, who is so practical and has so much experience with these things, suggested sewing on a button, so that Karen could wear the scarf more like a cowl. 


And I loved it so much I made another one for myself :)
Cat hair is a valid accessory, right?


(Please excuse my unbrushed hair and the awkward double chin from trying to take a picture of myself. I guess I need to learn how to work the timer on the camera.)


Tuesday, February 18, 2014

A little seal friend for Grace

One of my students, Grace, asked me to make her a panda and a seal (this may or may not have happened last November...ahem). I am just now finishing up her seal, and I have to say, I think it has turned out adorable. When I first started working on it, I was afraid it would turn out looking like an earthworm.


As you can see, it totally doesn't, it has such cute little tail fins! It also helped a lot once I added the nose. It made him seem much cuter and friendlier (if he's a him...he might be a she...I guess that's up to Grace). 


But as you can see, our little seal friend is still blind. I created the eyes below based on the instructions of the designer of the pattern (Valentina Oglezneva, I purchased it here at Ravelry.com), but I really struggled with painting on the yarn. I don't know if I didn't have the right paint or the right paintbrush (the only one I could find was pretty wide, so I was trying to paint all this with the corner of the brush), and it also seemed like the yarn was really fuzzy and made it hard to paint the circles well. You can see the weird fuzzies I'm talking about, right? 


Plus, the eyes seemed REALLY big for our poor little seal's face. So I decided to show them to Grace before I finished sewing them on. She wants button  eyes instead, so back to Hobby Lobby I go! I will post an update when our little seal can see!

Sunday, February 16, 2014

New Yarn

I bought some pretty bamboo yarn at Diane's Knitting Studio in the City Market Arts Center in downtown Savannah today.


My stash is starting to get a little out of control, so I am spending the evening trying to complete some works-in-progress and make some more room in my current yarn storage box.


Any project ideas for my new pretties?

Friday, February 14, 2014

A New Venture (and Adventure)

I am starting this blog as the first brave attempt at growing my little baby craft business.

I like to crochet toys (the technique is known as amigurumi) for my family, friends, dance students, acquaintances...anyone who will enjoy them and needs their day to be brightened a little!

Picture from Yarn Yard


My most popular item thus far has been this crochet unicorn from Yarn Yard (the link will take you to the free download page at Ravelry.com). Here is a similar one from Little Yarn Friends. I will post pictures of my creations (in all the different fun colors, and two with wings added also!) soon, but photography is not my strongest skill, so please be patient!

I have also made toys by request: two giraffes, an elephant, a jellyfish, a wolf, a seal, a panda, and currently I am working on an adorable puppy dog (among other things)

And then there are the usual projects in crochet: scarves, dishrags, baby blankets, other various size rectangles...pictures soon to follow!

I need all the advice I can get on crochet, crafting in general, starting a handmade business, and being a successful entrepreneur. I know this blog and the business will start slowly, so for right now I am treating it like an important hobby/semi-part-time job. I am going to start looking into getting the proper business licensing and really growing though, because when I move to Minnesota in May, I want to be able to rely on this as an extra source of income and a way to keep me occupied while I look for another job in my other area of expertise: dance (particularly ballet, modern, and musical theater). AAAHHH! Lots of terrifying (but exciting!) changes are in my future.

Will you come along on this new venture/adventure with me?
Questions: 

  1. How did you start your handmade business? Did you let it take off slowly, or did you jump in with both feet? 
  2. What has been the biggest thing that has helped your business to grow? A blog, going to craft fairs, setting up an online store? 
  3. Are there any resources you would recommend (crochet/craft, business/entrepreneurial, or other)? I have Kari Chapin's books, The Handmade Marketplace (which I read and was extremely helpful) and Growing Your Handmade Business. Any other books, tutorials, blogs, etc. that you found helpful?